Tips for growing root vegetables
I love growing root crops. It’s an adventure and a treasure hunt: You start with a tiny seed or root, and before you know it you are pulling on the tops, hoping for a good yield. Let’s start with the basics for beets, radishes and carrots, then scroll down learn how to grow a few more of my favorites: ginger, turmeric and horseradish.
Follow Big City Gardener
@BigCityGardner on Instagram
Big City Gardener blog
Basics for growing beets, radishes & carrots
1. Plant at the best time
Beets, radishes and carrots grow best when soil and air temperatures are between 50 and 75 degrees F. For fall harvest, plant in late summer and continue to do so throughout the fall months. They’re happy growing in full sun or even part shade. This makes them great candidates for interplanting with taller crops, which will help protect tender seedlings from hot temperatures in the South.
2. Start with great soil
Loose, well-drained soil is the key to producing large, nicely shaped root crops. Before you plant, be sure to remove rocks and debris that can inhibit root formation. I also like to work compost or a balanced slow-release fertilizer into the soil before I plant. These crops are versatile and you can grow them in the ground, in raised beds or even in containers. For beets and radishes and some shorter carrot varieties, look for a container around 12 inches deep. For longer carrots I recommend at least 18 inches deep. The wider, the better.
3. Use the furrow method for root vegetables
Beets, radishes and carrot crops grow well when planted using the furrow method, which is planting in a mounded row: When you run a trowel or hoe across your bed, you create a mound on either side. Instead of planting in the trench, plant in the loose soil of these berms. This is the opposite of what you do for most crops.
You Might Also Like:
How Many Vegetables to Grow
7 Easy Plants to Start from Seed
Small Vegetable Garden Design Ideas
4. Give seeds the right spacing
To plant, gently press the handle of a long-handled tool into the moist soil before seeding. Then sprinkle the seeds about an inch apart into the imprint and cover them with a thin layer of compost. To prevent the soil from forming a hard crusty layer, try keeping your newly seeded row covered with a tarp or burlap sack just until they sprout. Once the seedlings reach 2 to 4 inches tall, it’s time to thin them. Forgetting to remove some of the seedlings will lead to overcrowding, which causes poor root development.
Thinning seedlings
To thin, grab a pair of snips or scissors and cut out sprouts until you’ve achieved the spacing recommended on the seed packet. Try not to remove the stems by pulling them out. You can uproot and disturb the root zone for multiple plants if you do. I add the thinned sprouts to salads and smoothies.
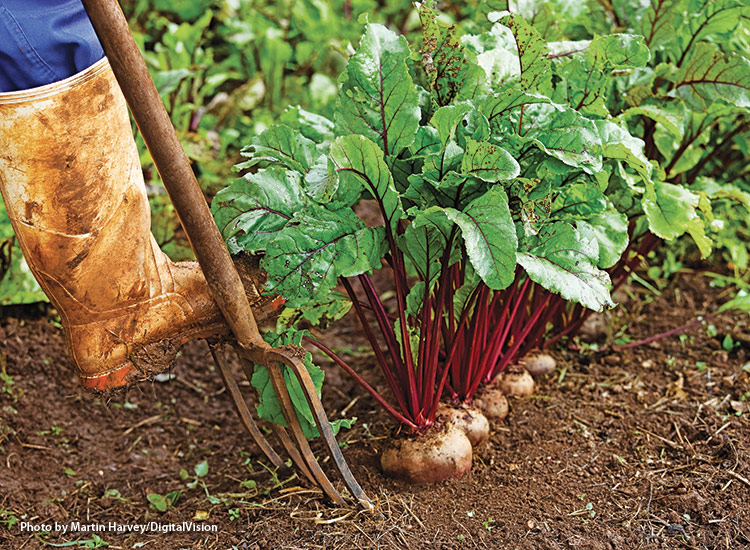
5. Harvest root vegetables early and often
Harvest these plants at various stages during the growing season. You don’t need to wait until they’re fully mature. If you’ve never tasted a baby beet, radish or carrot, try one and thank me later. The flavor is unlike any other. Unfortunately, baby root crops do not store well. For approximate maturity dates, refer to the seed packets. The phrase “ready to harvest XX days” refers to the days after germination so that’s when counting begins. I like to harvest when I see the shoulders of the crop sticking up from the soil.
Although root crops like to have regular moisture as they’re growing, stop watering as the roots reach maturity, as this can cause them to crack. Be sure to check out more detailed tips on my favorite root crops as you read on.
You Might Also Like:
Vegetable Garden Plan with Curb Appeal
How to Grow Garlic
How to Grow Radishes in Spring or Fall
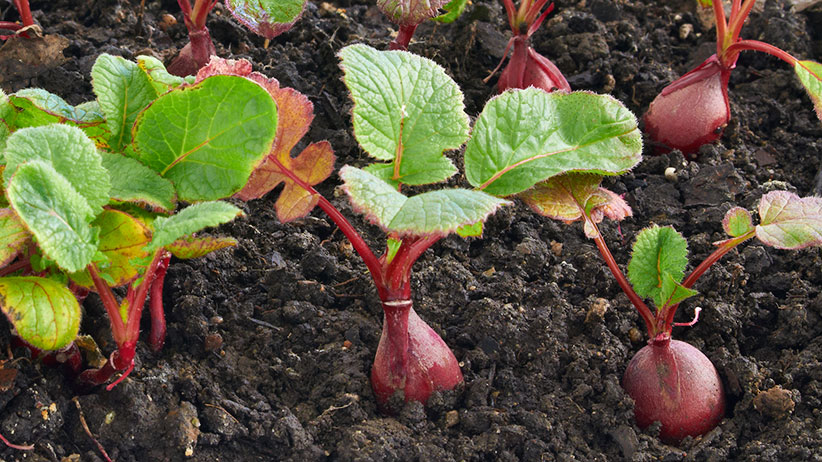
Tips for growing beets
Beets (Beta vulgaris)
- Each beet seed produces two to three sprouts.
- Soak beets seeds in water for up to 24 hours before planting to increase germination rates.
- Beets grow best in cooler temperatures. To keep soil cool, apply a layer of organic mulch once beets have sprouted.
- Try growing beet greens. These varieties only produce the green tops and no roots. ‘Fresh Start’ and ‘Fresh Pak’ are two of my favorites.
- Classic ‘Detroit Dark Red’ is also one of my go-to varieties. It retains its deep red color when cooked and its sweet flavor is perfect for juicing.
Beet Varieties to Grow from Seed:
'Sweet Merlin'
'Five Color Rainbow' beet seeds
Jewel-Toned beet seeds: Red, Gold & Candystripe
Tips for growing radishes
Radish (Rhaphanus sativus)
- Radishes can be ready to harvest around 4 weeks after germination.
- Don’t wait too long to harvest a radish. When sliced in half, a ripe radish will have a smooth interior. An overripe radish will have a cracked interior.
- Try growing ‘Round Black Spanish’. The contrast between the black outer skin and white flesh is impressive. The usually spicy white flesh turns sweet when sauteed with a little butter and herbs.
- For something different than the traditional radish, grow daikon radishes (Raphanus sativus var. longipinnatus). This type grows better in hot weather and its white flesh is milder than a red radish.
Radishes to Grow from Seed:
'Watermelon' radish seeds
Garden Party Radish seed mix
Crimson Crunch radish
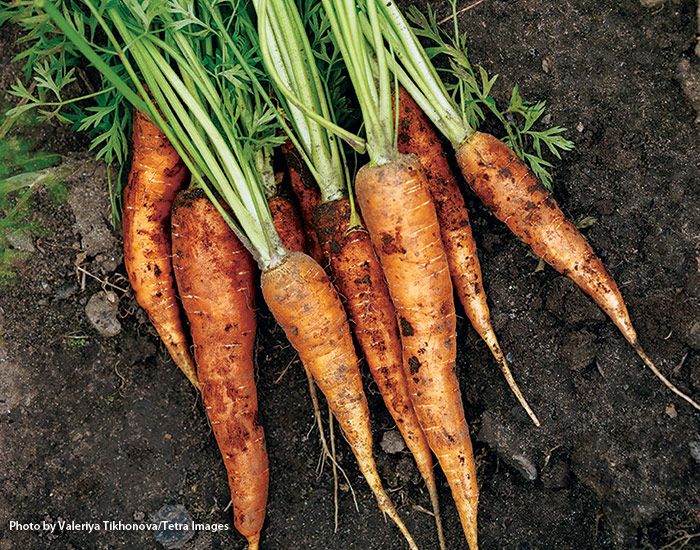
Tips for growing carrots
Carrot (Daucus spp. and hybrids)
- Be patient: Carrot seeds can take up to 3 weeks to germinate.
- Remove the tops of carrots immediately after you harvest to help the roots last longer.
- At the end of the season in fall you can “store” carrots in the ground by waiting to harvest them until you are ready. Just spread a 2- to 3-inch layer of mulch on top of the carrots to protect them. They’ll be fine until the ground freezes hard.
There are four basic types of carrots:
| Name | Description |
|---|---|
| Chantenay | Short, wide carrots; good for containers and poorer soil; good winter crop in warm climates. |
| Danvers | Medium-sized; best when harvested young; tolerates poor soil better than most varieties |
| Imperator | Medium-sized; most common in grocery stores; need deep, rich soil |
| Nantes | Small to medium-sized; sweet flavor; not usually grown commercially |
Carrots to Grow from Seed:
'Short Stuff' Chantenay carrot seeds
'King Midas' imperator carrot seeds
'Bolero Nantes' Crispy French Carrot seeds
'Rotild' Snacking Nantes carrot seeds
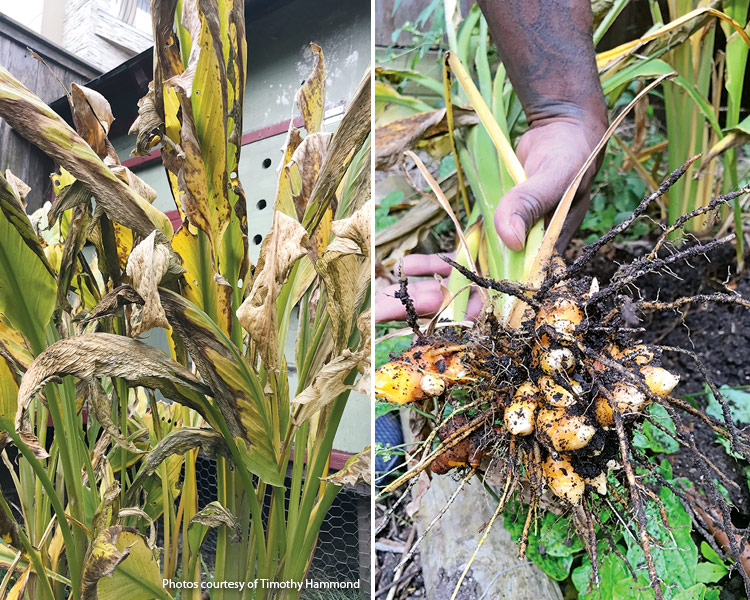
How to grow ginger & turmeric
Two of my favorite root crops to grow are ginger and turmeric (above). The zing they add to dishes, the aroma, and most importantly, their health benefits make them staples in my garden. Here are four tips for unmatched ginger and turmeric harvest. Once you grow your own, it will be hard to go back.
1. Choose the best spot to plant
Like most root crops, ginger and turmeric prefer loose soil, heavily enriched with organic matter. Avoid planting in an area that does not drain well. This will cause the rhizomes to rot. Once growing and established, plants can withstand slight droughts but to get a bigger yield, keep the growing area or container well mulched during the season. Choose a spot in full sun.
2. Start with high-quality ginger and turmeric rhizomes
I recommend buying rhizomes from a certified organic source. This way you know it has not been sprayed with root inhibitor. These rhizomes sell out fast so I order in fall or winter. That said, you can successfully grow from grocery store rhizomes, too; I have plenty of times but I always buy organic and soak the rhizomes before planting to remove any root inhibitor they may have been coated with. Ginger and turmeric rhizomes have bud points, or eyes, where the plant will sprout and begin growing. You have the option of planting the whole rhizome or cutting it into 2-inch pieces. Allow these pieces to dry for a few days to scab over before you plant.
Sources for Ginger & Turmeric Rhizomes:
Baker Creek Heirloom Seeds
Southern Exposure Seed Exchange
Turmeric from Territorial Seed Company
3. Plant, feed & be patient
In zones 8 or warmer, plant the rhizomes outdoors in the spring and harvest in late fall. In zone 7 or colder count back 10 months from your average last frost date and plant the rhizomes indoors. Use a container that’s at least 5 gallons and move it outdoors when temperatures are reliably above 70 degrees. Whether you plant in a container or directly into the garden bed, mix a slow-release fertilizer into the soil before you plant and start rhizomes about 8 inches apart and 3 inches deep. Make sure the growth buds are pointing up.Remember to fertilize monthly—these plants are heavy feeders. If growing in a container, fertilize after a heavy rain, which tends to wash the nutrients out of the soil. Once you plant, be patient. I’ve started rhizomes in my garden in early spring and not seen any growth until midsummer. If plants sprout indoors, be sure to move them to a sunny window or put them under lights until they can go outdoors. You can grow turmeric and ginger in a container as small as 5 gallons, but I like at least 15 gallons.
4. Harvest ginger and turmeric at the optimal time
When the foliage looks like the leaves turning brown above, it’s time to harvest. If you are growing in a container, this is as simple as overturning the container on a tarp to catch the soil, and picking out the rhizomes. If you’re growing in a bed, use a garden fork to dig a circle around the green foliage, 2 to 3 feet away from the sprouts. This way you lower the risk of accidentally damaging the rhizomes underground. After digging the roots, wash them off with a hose to remove as much soil as possible. You may even need a soft bristled brush to aid in this process. Allow the rhizomes to air dry for a few days before eating or preserving, and save some to replant the following year.
You Might Also Like:
Vegetable Garden Companion Plantings that Really Work
Problem-Solving Garden Books
Garden Compost Basics
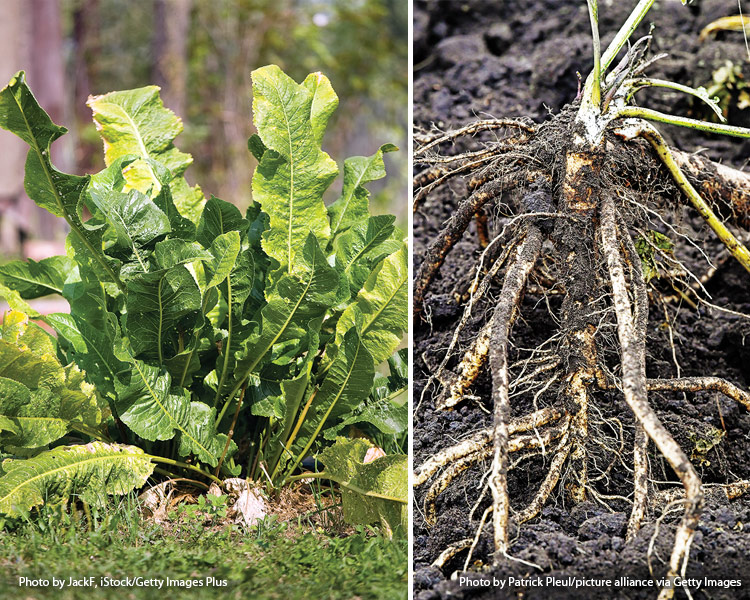
How to grow horseradish
Looking for a new culinary ingredient to grow? Try horseradish. This wide-leafed perennial has been cultivated for more 3,000 years and thrives in cooler climates. Follow these 3 tips to grow the ultimate horseradish.
1. Prepare the soil
Horseradish prefers well drained, loamy soils full of organic matter. Prior to planting, loosen the soil down to a depth of 8 to 10 inches and mix in an organic matter, such as compost or worm castings.
2. Plant the horseradish sets
Horseradish is grown from sets, or pieces of roots. In early spring start with a set that’s about 10 inches long and plant it vertically so the top is 2 inches below the soil’s surface. One horseradish plant is more than enough for a family. A plant will spread about 30 inches in each direction. In fact, it can be too aggressive in some gardens. If you are concerned about this, grow it in a pot to keep it under control.
3. Harvest at the right time
Horseradish is a perennial so it will come back in your garden every year. The best flavor and health benefi ts come from roots that are a couple of years old. Once the first frost has damaged the foliage, dig a circle around the main root with a garden fork or spade. Dig deeply: You want to harvest as much of each long, slender taproot as you can without breaking it. Every broken piece left in the soil will sprout a new plant. I have made the mistake of not being careful and ended up with horseradish everywhere in a bed. (This is why I now grow it in a container!) Once you’ve harvested the roots, wash and dry them and store them in your refrigerator for up to a few months until you’re ready to use them.
Horseradish sources:
Big Top Horseradish from Renee's Garden
Horseradish Roots from Territorial Seed Company
Horseradish roots from Johnny's Seeds