Upcycle plastic bottles
From plant markers to hot water bottles under row covers and even bottle-cap pot feet, you’ve probably already found clever, yet simple, ways to upcycle plastic bottles in the garden. But we have even more ideas for you! Rinse out and peel the label off a bottle. Then grab a pair of scissors or a box cutter to cut, a nail to punch holes and try out some of these seven handy ideas.
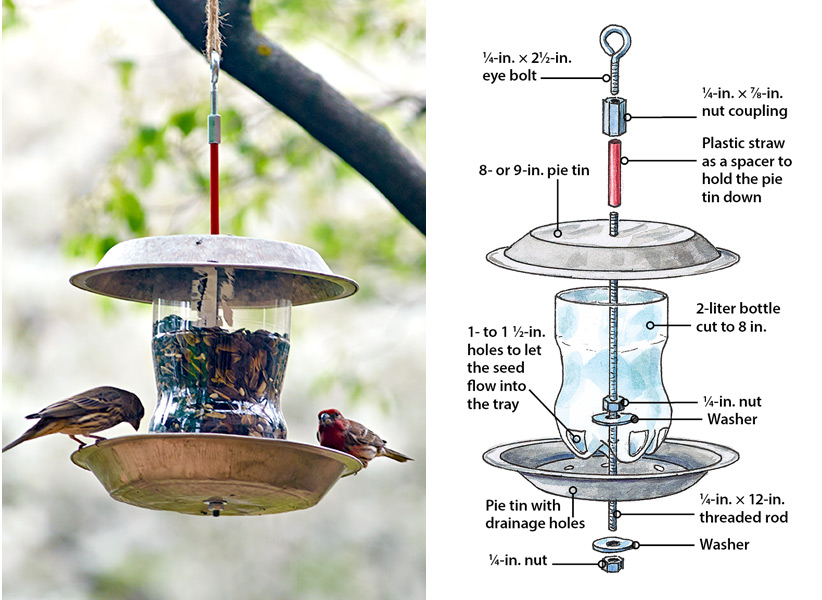
1. Make a bird feeder
Keep the neighborhood birds well fed with the easy-to-make feeder above. Be sure to punch a few drainage holes in the bottom pie tin to let rain and melted snow drain out. We filled this feeder with a general seed mix, hung it from a tree branch in our test garden and had birds eating there within minutes!
You Might Also Like:
DIY Terra-Cotta Bird Feeder Project
Upcycled Design Ideas for Your Garden
Ways to Deal with Garden Pests
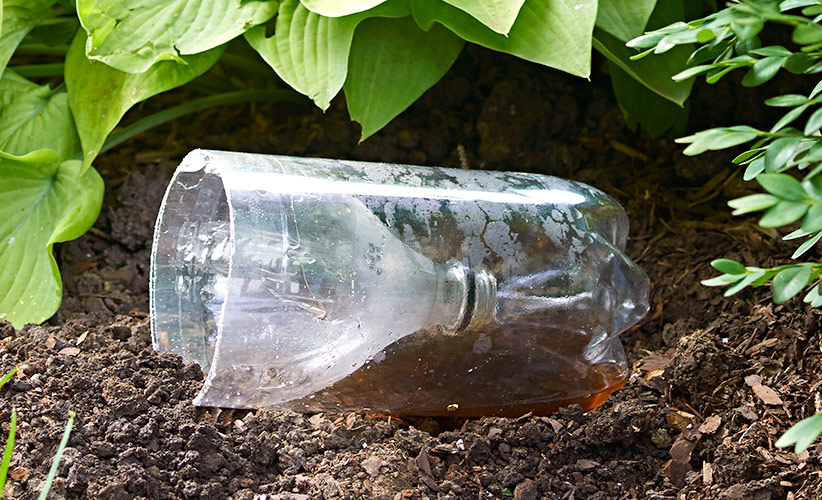
2. Garden pest traps
Use this technique to make a couple of different garden traps. Start by cutting the neck off a bottle a quarter to a third of the way from the top. Remove the cap, reverse the top part and insert it into the bottom. Whether you’re trapping slugs or wasps, when your trap has done its job, pull the “funnel” out, dump the contents and reload.
To attract and trap slugs
Pour beer into the trap and place it under plants slugs are fond of. Tilt it slightly, like in the photo above, to keep the beer from running out. The slimy critters crawl in through the opening, fall into the beer and drown.
To attract and trap wasps
Pour a couple of inches of a stale sugary soda with a few drops of dish detergent into the bottle. Set it upright in a sunny spot where you have spotted wasps. They fly into the trap to get the sugar and drown. Soap breaks surface tension so when they land on the water they quickly sink.
3. Upcycle plastic bottles into seed-starting pots
If you start a lot of seeds, here’s an economical how-to for making your own seed-starting pots:
- Cut the bottom off of a 2-liter bottle so you have a cup 2 or 3 inches deep.
- Use a nail and poke a few holes in the bottom.
- Fill the cup with seed-starting mix.
- Moisten the mix before you sow seeds or stick cuttings.
Create a mini greenhouse
For a mini greenhouse, use the top of the bottle to make a dome that will fit over the cup. Use the cap to help regulate heat and moisture. On sunny days remove it so you don’t cook the plants. Replace the cap at night to hold in heat and moisture.
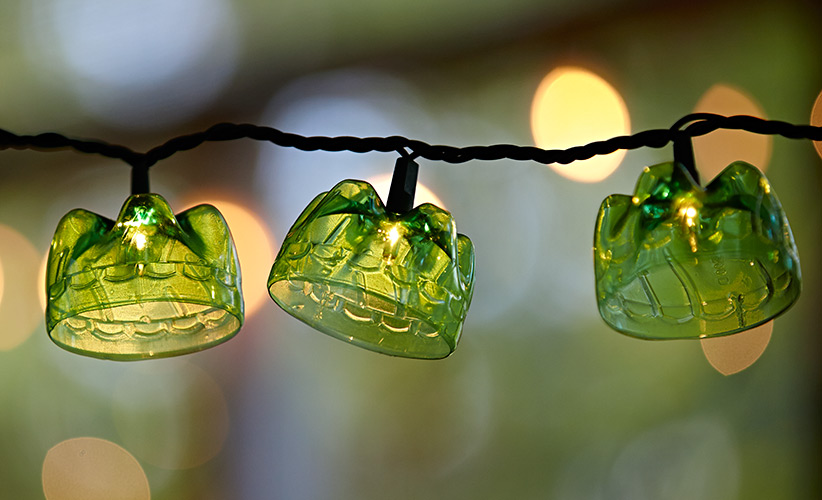
4. String light covers
Bottles can be decorative, too. Cut 1 to 2 inches off the bottom of a 12-ounce bottle. In the photo above we used the molded pattern near the bottom as a cutting guide. A band saw made a smooth, even cut.
Poke a ¼-inch hole in the center of each soda bottle bottom with a nail, making it large enough that the fixture holding the light fits snugly into it. Or use a drill to make the hole.
You Might Also Like:
DIY Garden Lighting Project
Wine Bottle Garden Lights
Smart Ways to Repurpose Tomato Cages
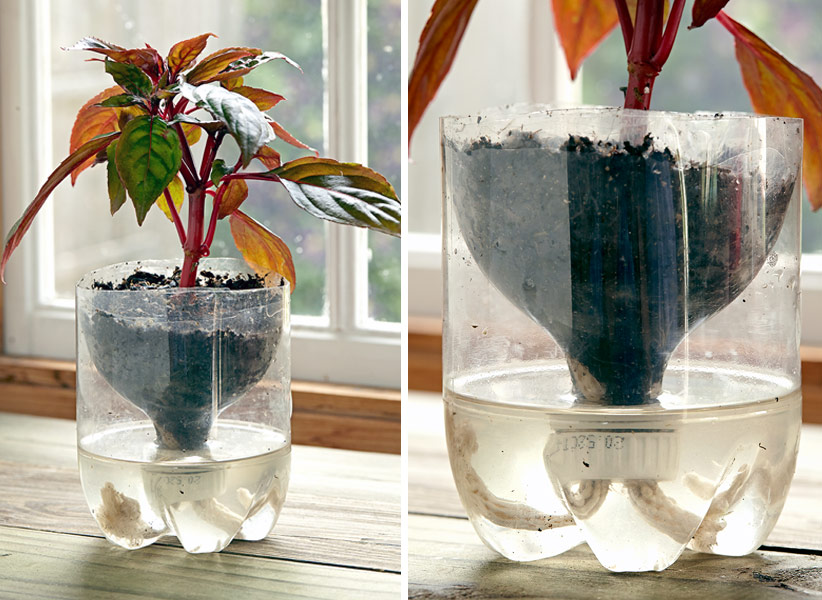
5. Self-watering planter
This technique uses a wick to pull moisture up into the soil. As long as the reservoir is filled and the wick is in the water, there will be a steady supply for plant roots. Start with a 2-liter bottle and cut off the top third. Then follow these steps:
- Take off the cap and drill two ¼-inch holes in it.
- From the inside of the cap, poke the ends of a short length (ours was about 4 inches long) of ¼-inch cotton rope through each hole. The ends should be long enough that when you screw the cap back on and put the planter in place they will reach the bottom of the reservoir.
- Leave a loop of rope inside the cap so it will stick up an inch or two into the soil.
- Once you have the lengths adjusted, screw the cap back on.
- Add water, and slip the top of the bottle into the bottom part as you see in the photo.
- Fill it with potting mix and add the plant. You can lift the top portion out when you need to add water, or cut a small hole in the side of the base so it’s even easier to refill.
6. Slow waterer
Drip irrigation is a good way to provide water to plants, but the systems can be expensive to buy. You can get a similar slow waterer if you poke a ⅛- to ¼-inch hole on the side of a large bottle, as close to the bottom as you can get. It’s less likely to get plugged with silt that way. Fill the bottle with water and set it next to a plant.
With the cap off, water seeps out and soaks directly into the soil. Use this same method to make a waterer that will encourage roots to grow deeply. After you poke the hole in a large bottle, bury it near the plant you want to water. But leave the neck just above the soil line so you can fill it with your hose or even a water-soluble fertilizer solution.
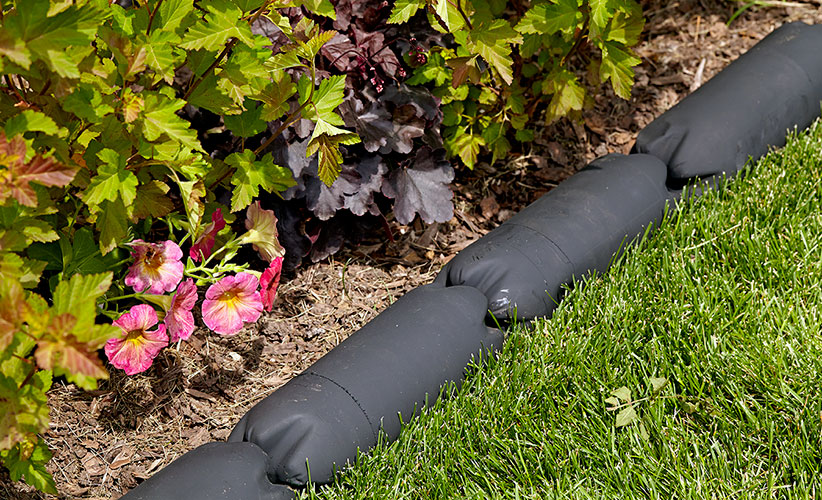
7. Affordable garden edging with upcycled plastic bottles
A good edging defines the bed and slows grass as it tries to creep into your plantings. This one will creatively do both of those jobs. Gather many of the same kind of bottle. Count on two 2-liter bottles to make about 10 inches of edging. To make the edging, follow these steps below:
- At the widest point below the neck of the bottle, cut the tops off.
- Fill one bottle with sand, gravel or soil for weight and push the other one over it to form a capsule, as you see in the photo above.
- Cover the bottles with a paint recommended for plastic and let them dry. Repeat until you have enough capsules for your project.
- Dig a trench and lay the bottles end to end. They should stick up above the soil an inch or two.
- Make sure they’re low enough that they won’t be nicked by the lawn mower.
- But if one gets damaged, simply make another capsule and tuck it in.
You Might Also Like:
Garden Edging with Upcycled Hoses
DIY Garden Edging
Low-Maintenance Garden Bed Planting Plan