


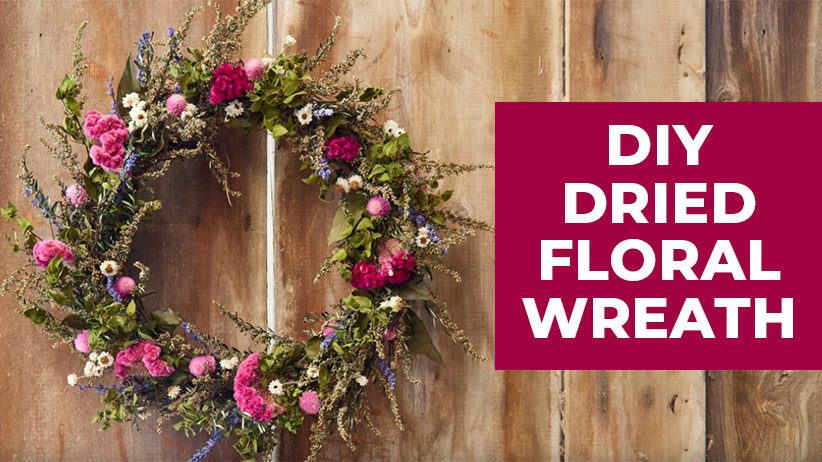
DIY Dried Floral Wreath
Want to enjoy your flowers for years? Dry them and show them off indoors in a bouquet or a floral wreath! Here's a simple wreath that you can make with flowers you grow and dry, buy from a local flower farmer or pick up at the craft store.
We asked Erin Howell-Conner of Howell's Greenhouse and Pumpkin Patch in Cumming, Iowa, to share her secrets for making dried-flower wreaths. She's been growing flowers to dry for over 30 years and has a lot of handy tips for drying and arranging these blooms so they look great and last a long time.
Materials & supplies
- 14-in.-diameter grapevine wreath
- Glue pillows or glue sticks
- Hot glue pot or glue gun
- Dried flowers and greenery
Great dried flowers & greenery to use for a wreath
- Cockscomb celosia (Celosia argentea cristata)
- Statice (Limonium sinuatum)
- Winged everlasting (Ammobium alatum)
- Blue salvia (Salvia farinacea)
- Flamingo feathers celosia (Celosia argentea spicata)
- Globe amaranth (Gomphrena globosa)
- Mugwort (Artemisia vulgaris)
- Mountain mint (Pycnanthemum virginianum)
How to create a dried floral wreath
As you work on it, hang or prop your grapevine wreath up so you can easily see how all the floral elements look. This will help get a balanced look to the arrangements.
Step 1: Create a greenery base
Start by adding greenery to the grapevine wreath as a base for the more colorful dried flowers that will go on later. In the video, Erin uses mugwort and mountain mint for her wreath design. You can use a pair of snips or your hands to cut or break off pieces that you'll attach to the wreath. Cut off a few stems, remove lower leaves to make them easier to place then dip the ends into the hot glue pot. You can also use a hot glue gun but that tends to be more time consuming.
Tips for great-looking greenery
- AS you place the greenery make sure it's all going in the same direction. It creates a more pleasing look and a sense of movement around the wreath.
- No need to let single leaves go to waste — these and small sprigs can also be glued in place.
Hot glue tip
When you're working with a hot glue pot, glue strings are inevitable. They trail across the wreath, looking a bit like cobwebs. Erin finds it's easier to remove them as you go rather than to wait until later when it's a big tangled mess.

Step 2: Add color with dried flowers
With the greenery in place, it's time to start adding the dried flowers. Erin finds that it's easier to start with the larger flowers then tuck smaller ones in around them. With its bright color and interesting shape, the cockscomb celosia is the attention getter on this dried-flower wreath. Odd numbers tend to look best.
Step 3: Add more flowers!
Once the biggest flowers are in place, it's time to add contrast. Group stems of smaller flowers here and there. Single stems don't stand out enough on their own.
You Might Also Like:
Tips for Growing a Cut Flower Garden
Succulent Wall Planter
DIY Bird Feeder Wreath Project
Step 4: Add finishing touches to the wreath
When you have all the flowers you want on the wreath, go back through and tuck more greenery in the empty spots. Don't forget to cover a portion of the inner and outer edge so you have a full look.
Now take a step back to look over what you've done and rotate the wreath so you can see it from different angles. Add more flowers or greenery to get the wreath you want.
Dried floral wreath care
A dried floral wreaths can last for years if you take good care of it. Make sure it's out of direct sunlight so the colors don't fade. If some of the stems break off or get damaged, replace them like you did when you first made it.
The longer your wreath is around the more dust becomes a problem but a dried floral product spray, such as Dry Splendor, can get rid of it. Spray the wreath thoroughly following label directions.
How to store your dried floral wreath
If you need to store your dried floral wreath, wrap it in tissue paper and place it in a cardboard box. You may need some additional tissue to keep it from moving around and getting damaged. Erin doesn't recommend storing your wreath in a plastic tote. Even dried flowers have a bit of moisture, and in a sealed plastic tub this can cause the colors to run or mold to form.
You Might Also Like:
DIY Marbleized Terra-Cotta Pots
Natural Housekeeping Ideas using Garden Herbs
Homegrown Lavender Sugar Scrub Recipe


