Many vegetables do better when you trellis them. It keeps the fruit clean, makes them easy to pick and exposes more leaves to sunlight. There are lots of ways to trellis vegetables. Here are 4 simple DIY trellises you can make for your vegetable garden.
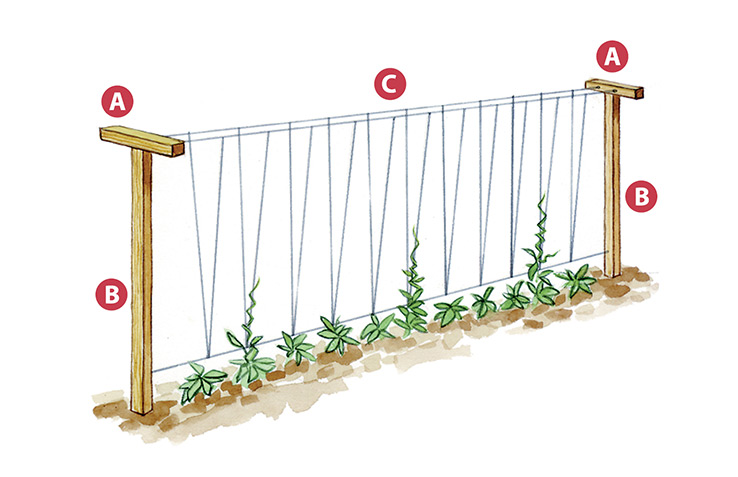
Trellis for pole beans
Here’s a design perfect for pole beans. This method makes fall cleanup a snap.
Materials
- (2) 1-ft.-long 2×2s
- (2) 5-ft.-long 2×2s
- Galvanized screws
- (6) eye screws
- Approx. 27 ft. of 16-gauge galvanized steel wire
- Twine
How to build the trellis for pole beans
- Using galvanized screws, attach a 1-ft.-long 2×2 (A) to the top of a 5-ft.-long 2×2 (B) to form a “T” post. Make a second “T” post the same way.
- On the inside of each horizontal crossover (A), drill two small holes 3½ in. from the ends. Insert eye screws into these holes to hold the two top wires (C).
- About 16 in. from the bottom of each vertical 2×2 (B), drill another hole and insert an eye screw facing the same direction as the eye screws in the horizontal crossover (A).
- Space the posts 8 ft. apart and sink them 1 ft. into the ground. Connect the eye screws from one post to the other with 16-gauge galvanized steel wire (two on top; one on bottom).
- Run twine from one top wire, under the lone bottom wire, and up to the other top wire, forming a narrow “V.” Just tie it in place.
- At the end of the season, just cut down the twine and vines still hanging in place.
You Might Also Like:
Vegetable Garden with Curb Appeal
7 Easy Plants to Start from Seed
Growing Vegetables in Galvanized Raised Garden Beds
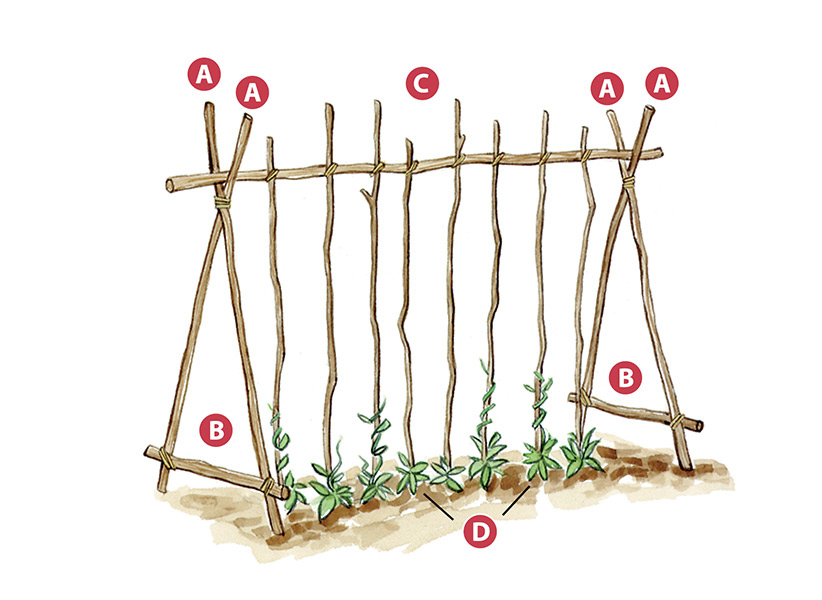
Make a trellis with branches
This structure is highly flexible, so its final size is up to you. It's perfect for pole beans and peas.
Materials
- (5) 5-ft. branches
- (8) 4-ft. branches
- (2) 2-ft. branches
How to make a trellis with branches
- Cross two 5-ft. branches (A) to form a long-legged “X” and tie them together where they intersect. Take a 2-ft. branch (B) and tie it near the bottom of the “X” to form a triangle with legs.
- Make another triangle just like the first.
- Position the two triangles about 4 ft. apart and sink the legs into the ground. Lay a 5-ft. branch (C) on top of the two triangles, leaving the ends sticking out.
- Tie the 4-ft. branches (D) so they hang from the 5-ft. branch (C) and touch the ground.
- Train your vegetables up these 4-ft. sticks
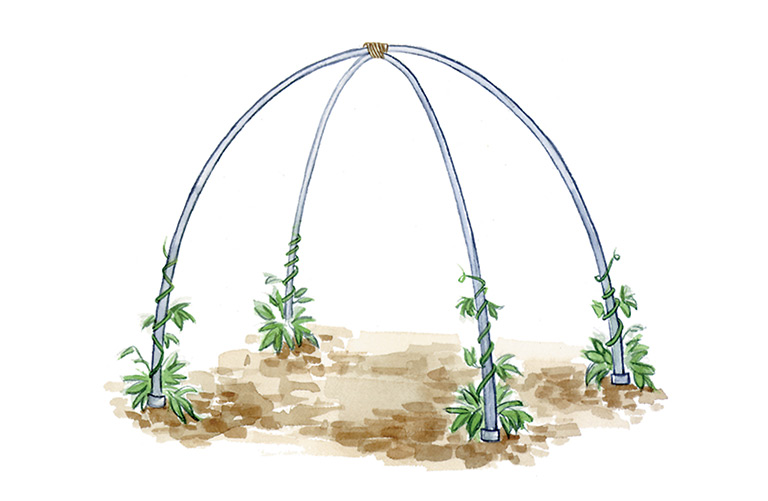
Make a hoop trellis
It doesn’t get simpler than this design. Use the hoops to grow pole beans (four plants per leg), and fill the area underneath with an early crop of peas or spinach.
Materials
- (2) 12-ft.-long, ½-in.-diameter black poly pipes
- (4) 2-ft.-long metal or wooden rods, ⅜ in. in diameter
- Twine
How to make a hoop trellis
- Sink two rods into the ground about 6 ft. apart. Leave 6 in. exposed.
- Connect the rods with an arching 12-ft.-long section of black-poly pipe
- Make another hoop this same way, binding the two with twine where they cross.
You Might Also Like:
Woodworking Projects for the Garden
Upcycled Trellis Idea
DIY Potting Bench How To
Quick-Growing Annual Vines
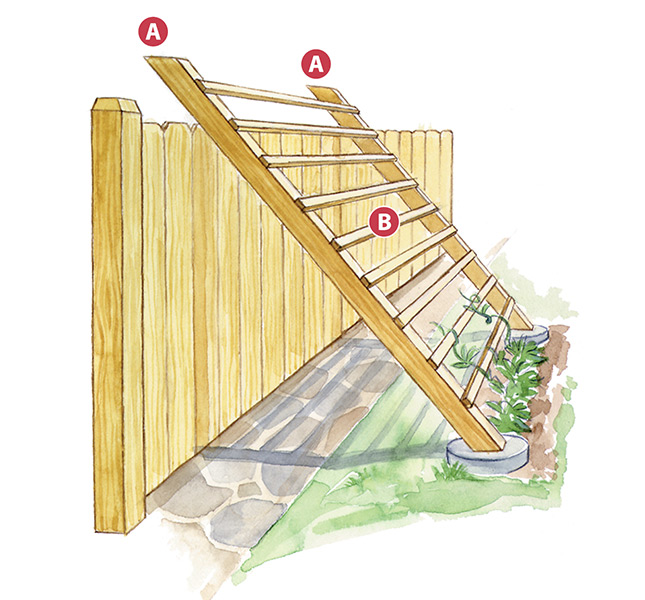
Sturdy trellis
This design is perfect for vegetables that need a little sturdier structure. Squash, cucumbers, melons and even tomatoes are good candidates. It could also be replicated just by leaning a construction pallet or ladder against a fence and training plants on it. The final size of this structure will depend on the height of your fence or wall.
Materials
- (2) 2×4s (A) about a third longer than the height of what they’re leaning against
- Several pieces of ¾ × ½-in. wood, 3 to 4 ft. long
- Nails
How to make a sturdy trellis
- Cut the tops and bottoms of both 2×4s at a 45-degree angle.
- Using paneling nails, attach rungs of ¾ × ½-in. wood (B) every few inches.
- For lightweight vegetables, simply lean the legs against the fence. With heavier produce, you may need extra support, such as concrete pavers, to set ends into.