


Click to see a larger illustration.
how to create
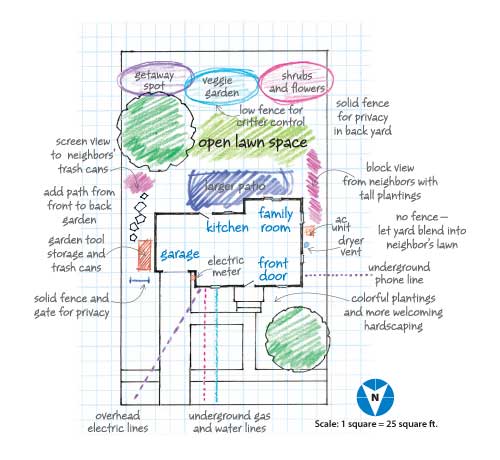
a base map
On any journey, the first step is often the hardest. Designing your own landscape can be an overwhelming proposition. But it doesn’t have to be. A good place to start is to make a base map. A base map is like a blueprint for your property.
MAKE A SKETCH — To create one, sketch out the shape of your property and include all the elements, such as the house, garage, driveway and deck or patio. Then measure everything and add the dimensions to your sketch.
ASSESS WHAT YOU HAVE — Next, look at what you have and decide what things you like, and what you’d like to change. Here are some things you’ll want to consider:
- Location and sizes of sidewalks, paths, driveway — any permanent features you plan to keep
- Overhead and underground utility lines; in the United States contact One Call at 811 to mark your property
- Location and general sizes of doors, windows, meters, dryer vents and AC units
- Trees and shrubs you intend to keep
- North, so you know sun and shade patterns
- Desirable, as well as objectionable, views
- Drainage issues that will influence your design
- Service areas for compost, trash and recycling
DRAW A BASE MAP — Once you’ve assessed the site, it’s time to refine that information into a base map. This map needs to be in scale, so work with graph paper and a ruler. A good scale to work with is one-quarter inch equals 5 ft. You’re going to draw and write your ideas on the base map. Since it’s something you’ll want to save for future reference, make several photocopies and keep the original clean.
Make a list of things you’d like to have in your yard, such as a vegetable garden, perennial border, a garden shed or play structures. Place the elements from your list on the drawing where they might work best. You don’t need defined shapes and sizes, just circle the location. Then take your base map and walk around the garden, envisioning where the elements you want will be located. Erase and redraw the elements in different locations if you need to until you have a good map of where everything should go. You’ll use this map as a guide as you create the areas in your yard. If this seems like a lot of work, remember that arranging your landscape on paper is much easier and cheaper than having to adjust it once you start installation!
Want more ideas on designing and growing a gorgeous garden? Check out The Year in Gardening, Volumes 13-15


