Special Gift Offer
URL:
http://www.gardengatemagazine.com/articles/how-to/prune/topiary-basics-with-linda-vater/
Share:

Topiary Basics with Linda Vater

By: Linda Vater
Topiary plants add charm to every garden. Learn which plants make good topiaries, get ideas for displaying them, and even learn to prune one yourself with these tips.

Linda Vater trimming topiary on an outdoor table: Linda Vater has a passion for all types of topiary!

A passion for topiary

May I be a garden bully for just a moment? If you are a gardener, whether new or experienced, and have not yet dabbled in the joy, meditation and artistry of topiary, then I tell you, you simply must give it a go. Don’t let its mistaken reputation for being difficult, highly sophisticated and expensive fool you.
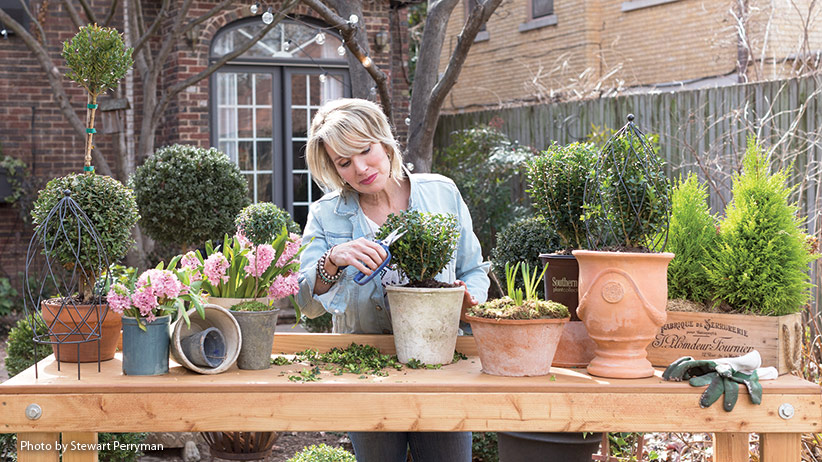
As you can see in my garden above, pruning plants into topiary forms gives you so many options for shapes and sizes. And it can be created out of the most common and inexpensive plants. A skinny, lanky boxwood (Buxus hybrid) in the clearance aisle may have great potential, as would a leggy basil (Ocimum basilicum) or coleus (Plectranthus hybrid) needing a good pinching to encourage bushiness. I often shop my own garden for topiary candidates: small junipers that have volunteered or been planted by birds or squirrels and trimmings of boxwood that took root after I clipped the hedge. Divisions or cuttings of herbs like rosemary (Salvia rosmarinus) may start small but over time can mature into beautiful specimens.

Follow Me:
Linda Vater | Garden Inspired Living
Potager Blog on Instagram
Enter Linda's Book Giveaway for The Elegant and Edible Garden!

The best plants for topiary

Plants used for topiary are typically evergreen with woody stems; have small needles, leaves or foliage; will develop a dense growing habit when frequently pruned; and have a compact or vertically upright and/or columnar growth pattern. But flowering plants like roses and lantana can be trained magnificently as well. I especially love clipping and training fragrant specimens like scented geranium (Pelargonium hybrid), rosemary and lavender (Lavandula spp. and hybrids).

For the impatient, wire forms can create “instant” topiary when you train long stems of rosemary, thyme, ivy (Hedera spp. and hybrids) or wire vine (Muhlenbeckia axillaris) around them. Obviously, however, depending on the scale and ambition of your topiary project, creating and training a topiary takes patience, a good eye and a steady hand. But most importantly, I have found it requires simple bravery, sharp shears and an attitude that one really can’t make a mistake. The worst haircuts ultimately grow out, after all.

You Might Also Like:
Ideas for Growing Herbs in Pots
Different Types of Lavender
DIY Spiral Topiary

Linda Vater's Favorite Topiary Plants

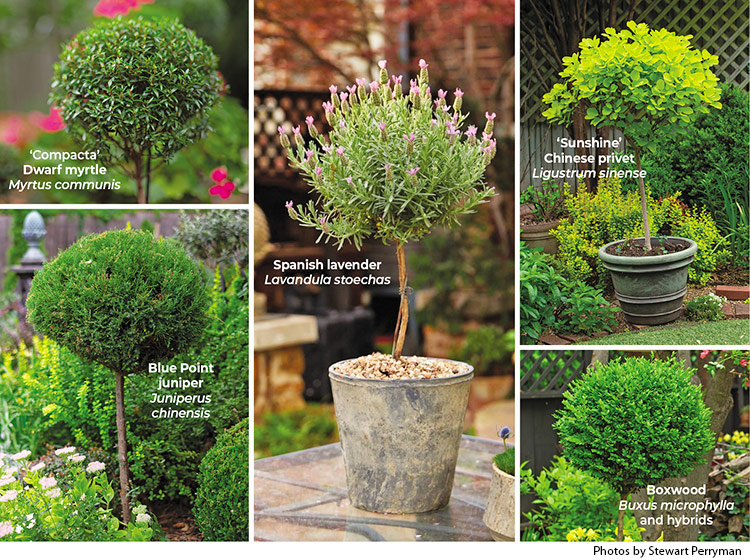
Favorite topiary plants

Selecting a good topiary candidate can be as easy as walking through your garden. Here are a few of my go-to plants.

  • ‘Compacta’ dwarf myrtle Myrtus communis
    Good tabletop topiary. Has an expensive, sophisticated look. Needs a lot of moisture: Never let plants dry out. Responds well to frequent pruning. USDA cold zones 8 to 10.

  • Juniper Juniperus chinensis
    Great for big outdoor specimens. Look for seedlings in your garden. Plants are very cold hardy and drought tolerant. USDA cold zones 4 to 9.

  • Spanish lavender Lavandula stoechas
    Lavender is a little more difficult to start from scratch. It’s a good one to buy already in topiary form. Not always long lived but fragrant and beautiful while it lasts. USDA cold zones 8 to 11.

  • ‘Sunshine’ Chinese privet Ligustrum sinense
    This gold-foliaged shrub assumes topiary form very quickly when you start your own. Requires frequent pruning to maintain shape and size. USDA cold zones 6 to 10.

  • Boxwood Buxus microphylla and hybrids 
    Classic plant medium for creating topiaries. I like to use them both in containers and in the garden. They provide much-needed architectural evergreen structure in winter and in the growing season. USDA cold zones 5 to 9.

Topiary in Linda Vater's Garden: Topiary can make a unique focal point when placed in a garden border.

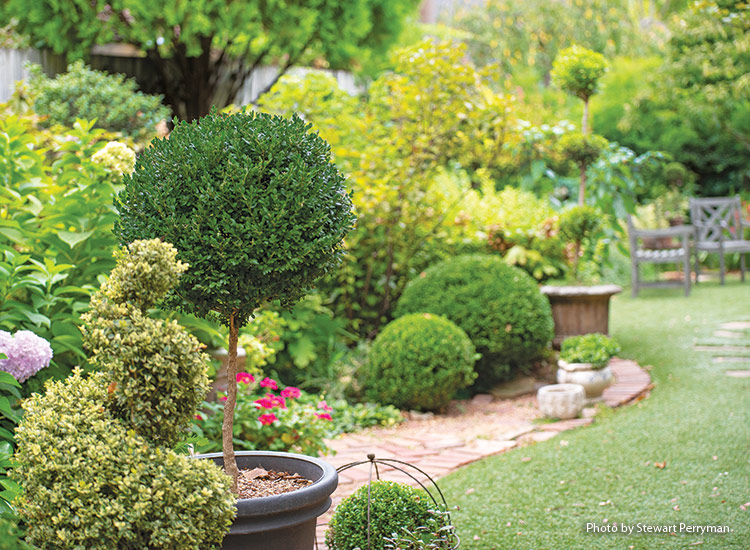
How to show off your topiary

In my own garden, I use topiaries in simple geometric forms like balls and cones planted rhythmically or as focal points around the landscape. But my favorite way to plant and stage them is in containers. I have huge potted specimens that are placed strategically in my outdoor living areas, and also collections of smaller plants grouped on plant stands and tables both inside and out. Sometimes I gather several in one spot, like on my potting bench. I love moving them about as they migrate between home and garden for holidays, interior decor or table centerpieces.

You Might Also Like:
Small Space English Garden
What to Do About Boxwood Blight
Tips for Adding Structure to Your Garden

Linda Vater topiary: You don’t have to wait until your topiary are finished growing to show them off. I love to stage a young collection like this together!

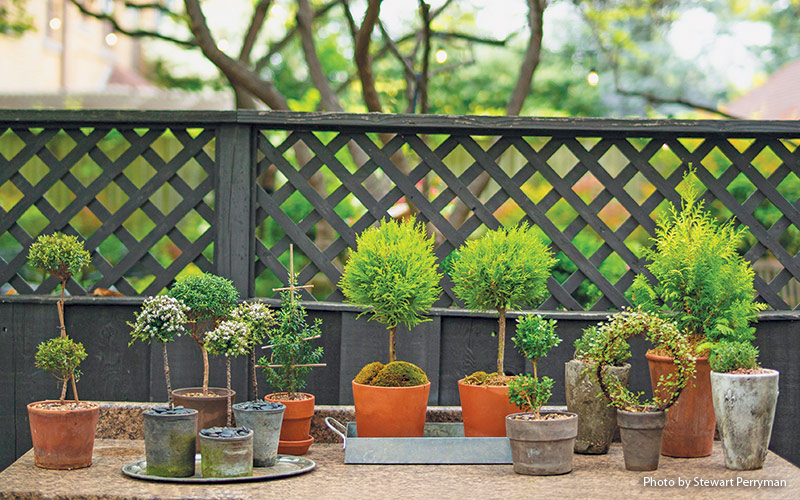
Topiaries in containers

While topiaries can take complex forms, classic geometric ones like the simple lollipop shape, or standard, captivate me. Simple and elegant. Just like a topiary. Beautifully aged pots and carefully selected containers give your topiary, no matter how humble its origins, an expensive, finished look.

Topiary top dressing materials

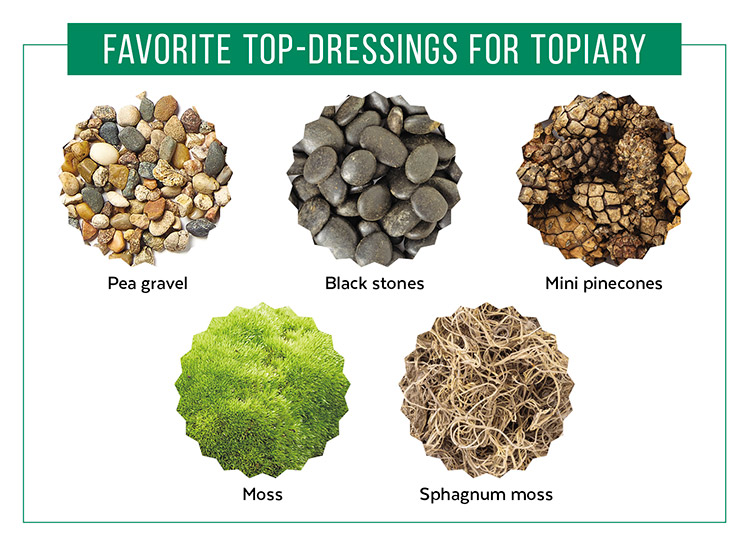
Finish off your topiary with a top dressing

Adding a top dressing to your topiary will complete the look and add another accent to the container. Here are a few of my favorite materials to use:

  • Pea gravel
  • Black stones
  • Mini pinecones
  • Moss
  • Sphagnum moss

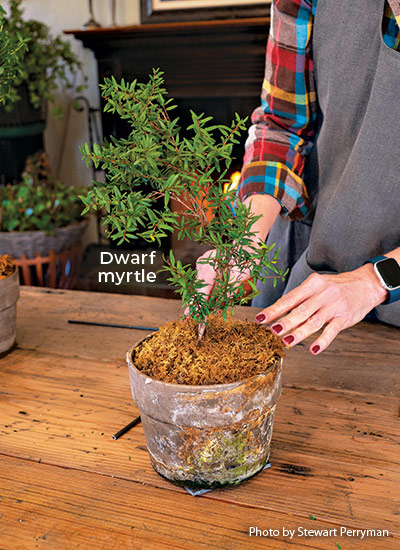
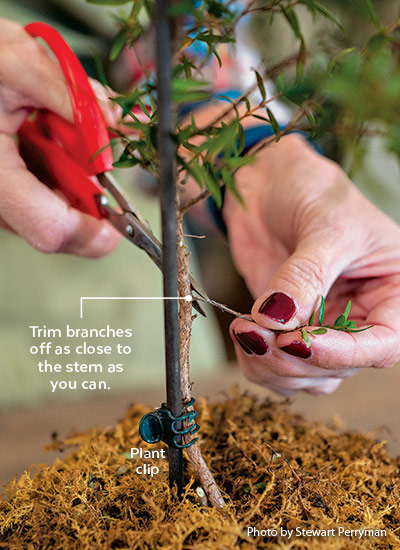
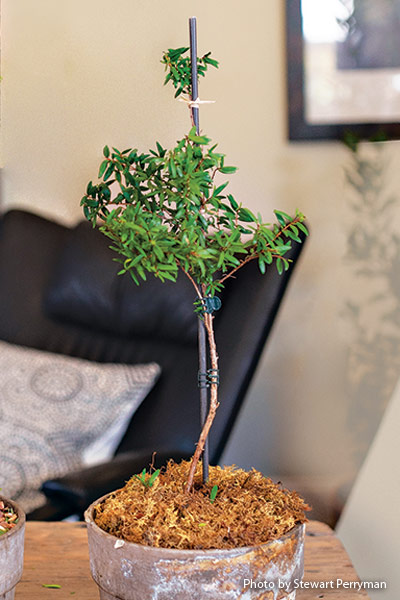
How to create a simple topiary

Once you start looking at the plant world through a topiary lens, you will be able to spot good candidates anywhere and everywhere. Myrtle topiaries are some of my favorites, and I’m always on the lookout for them. When a friend gave me this rooted cutting, I knew just what to do with it. Follow along as I show you.

Step 1: Choose the right topiary plant 

Step 1: Choose the right topiary plant 

To create a standard, or ball on stem, topiary, look for plants with a strong and straight central stem with good, high branching that can be trained vertically to grow upright. This one fit all of those requirements. If it were a bushier plant with several stems, I might have chosen to do a simple ball rather than a standard. Whichever direction you go, make sure it’s healthy and vigorous.

Step 3: Prune the base and stem

Step 3: Prune the base and stem

Using sharp snips or pruners, cut away branches starting at the base and moving up the stem. Clip as close to the stem as possible for a clean, crisp look. At some point toward the top, the foliage will start to be thicker. Stop pruning the stem there and start shaping the ball. Just remember that additional height comes from new growth at the top of the plant, so if you want your topiary to grow taller, let it grow more before you finalize the bottom of the ball.

Step 5: Groom and maintain 

Step 5: Groom and maintain 

I like to topdress or mulch my topiary with an attractive layer of gravel, moss or holiday-inspired natural materials that speak to the season.

As new growth forms, clip new shoots back by up to half to encourage more growth and shape the form. I’ll probably do so every week or two during the growing season for this dwarf myrtle. Some plants are slower growing and others are faster.

Step 2: Stake and clip 

Step 2: Stake and clip 

Moisten the soil and wiggle a stake as deeply and as close to the trunk as possible without damaging the plant. I usually use thin bamboo stakes a little taller than the plant and secure the stem to the stake (not too tightly!) using twine, small clips or string. Depending on the height of the plant, secure it in multiple spots up and down the trunk to help it grow straight.

Step 4: Clip for shape and size

Step 4: Clip for shape and size

Once I secured it to the stake, the little tuft at the top of this dwarf myrtle showed potential as a double ball form so I left it in place. Because it was small, I let it grow a bit more before clipping it. However, I shaped the lower “ball” into a loosely rounded form. As a rule I’ll take the growth back by about a third. You can be as conservative or aggressive as you’d like at this point. Clip a little, stand back and look, then clip again, turning the pot frequently so you can see all sides and make it as symmetrical as possible.

Step 1: Choose the right topiary plant 

Step 1: Choose the right topiary plant 

To create a standard, or ball on stem, topiary, look for plants with a strong and straight central stem with good, high branching that can be trained vertically to grow upright. This one fit all of those requirements. If it were a bushier plant with several stems, I might have chosen to do a simple ball rather than a standard. Whichever direction you go, make sure it’s healthy and vigorous.

Step 2: Stake and clip 

Step 2: Stake and clip 

Moisten the soil and wiggle a stake as deeply and as close to the trunk as possible without damaging the plant. I usually use thin bamboo stakes a little taller than the plant and secure the stem to the stake (not too tightly!) using twine, small clips or string. Depending on the height of the plant, secure it in multiple spots up and down the trunk to help it grow straight.

Step 3: Prune the base and stem

Step 3: Prune the base and stem

Using sharp snips or pruners, cut away branches starting at the base and moving up the stem. Clip as close to the stem as possible for a clean, crisp look. At some point toward the top, the foliage will start to be thicker. Stop pruning the stem there and start shaping the ball. Just remember that additional height comes from new growth at the top of the plant, so if you want your topiary to grow taller, let it grow more before you finalize the bottom of the ball.

Step 4: Clip for shape and size

Step 4: Clip for shape and size

Once I secured it to the stake, the little tuft at the top of this dwarf myrtle showed potential as a double ball form so I left it in place. Because it was small, I let it grow a bit more before clipping it. However, I shaped the lower “ball” into a loosely rounded form. As a rule I’ll take the growth back by about a third. You can be as conservative or aggressive as you’d like at this point. Clip a little, stand back and look, then clip again, turning the pot frequently so you can see all sides and make it as symmetrical as possible.

Step 5: Groom and maintain 

Step 5: Groom and maintain 

I like to topdress or mulch my topiary with an attractive layer of gravel, moss or holiday-inspired natural materials that speak to the season.

As new growth forms, clip new shoots back by up to half to encourage more growth and shape the form. I’ll probably do so every week or two during the growing season for this dwarf myrtle. Some plants are slower growing and others are faster.

Published: May 20, 2022
Share:

Product Recommendations

Here are some supplies and tools we find essential in our everyday work in the garden. We may receive a commission from sales referred by our links; however, we have carefully selected these products for their usefulness and quality.

GDT_Mothers Day Gift Guide 2024_300x250-green button

Related Tags

garden design patios decks special techniques

Related Articles


GDT_NewsletterBanner_zone10
GDT_SubPromoAd_DigitalPremium_zone7and11MOBILE_Free_Book

You Might Also Like…

| How To…

Weed Watch: Multiflora Rose

This invasive plant can form a dense thicket in a few years as its thorny, arching stems take root. Here's how to get multiflora rose under control.
GDT_Backyard Retreat_865x490