DIY Plant Pots Are Easy to Make!
Trying to use less plastic when starting seeds? Make your own pots. This video shows a couple of DIY plant pots that use paper products you most likely have on hand. It's a great way to recycle newspaper, bath tissue or paper towel rolls and other papers you might normally throw away. And you can plant your seedlings pot and all — these pots are biodegradable. Here are the instructions for a few different types of DIY paper plant pots.
You Might Also Like:
Roll With It...Or On It
Seed Starting Tips
7 Easy Plants to Start From Seed
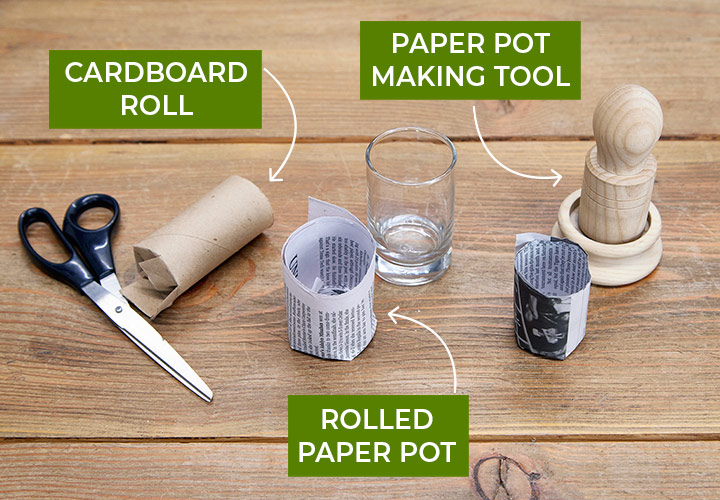
DIY rolled paper pot
1. Choose your paper Newspaper works best, since it will degrade fastest once planted in the ground. Paper sacks, notebook paper, packing paper and non-glossy advertising paper also work. Avoid papers with color printing and glossy finishes in case the inks and glues contain contaminants. Most newspaper print, laser printer and ink jet printer inks are considered garden-safe.
2. Cut paper strips Cut strips of paper about 3 1/2 inches wide. You can make strips wider or narrower, depending on the desired height of your pot. Strips should be at least 12 inches long, which will create a pot with two layers of paper for stability.
3. Choose a rolling form You can use almost anything with a 1- to 1 1/2-inch diameter as a form to roll your DIY paper plant pot. A drinking glass, vase, wooden dowel, spice jar, or pill bottle all work well, just make sure the sides are straight, not flared out.
4. Roll the paper Lay your rolling form down on a strip of paper, leaving about 1/2 to 3/4 inch hanging off the bottom edge. Roll the strip of paper over the form.
5. Fold the bottom Holding the loose end of the paper strip, pleat and fold the bottom of the paper over the flat bottom of the rolling form. This makes the bottom of your pot. Press the form down on a table to crease the folds and help make a flat bottom.
6. Slide out the pot Slide the paper off the form. The folded bottom should hold the layers of paper together in a pot shape.
7. Fill with potting mix Don't worry if the pot doesn't stand straight up when empty. Once it's filled with moist potting mix it will stay upright, ready to plant.
8. Set and plant Set your DIY paper plant pot in a tray and plant your seeds. When seedlings are ready to plant outside, sink the whole pot into the soil, being sure to cover the top edge of the paper so it doesn't wick moisture out of the pot. You can easily tear the moistened paper pots off the seedlings if you want, but roots will grow through the paper, so it isn't necessary.
You Might Also Like:
Starting Seeds with Soil Blocking
Easy Setups for Starting Seeds Indoors
When to Start Seeds Indoors
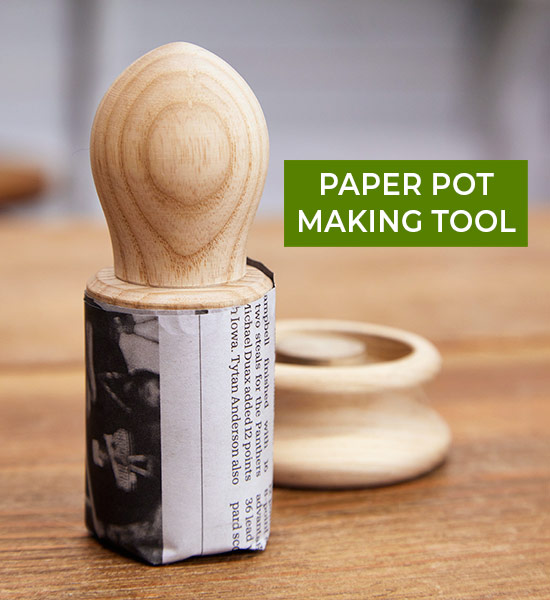
Try a paper pot making tool
Though you can use all kinds of forms to make a DIY paper plant pot, this tool makes it super easy. The sides are etched with lines to make it easy to roll the strips straight. The steps are the same until you get to folding the bottom of the pot. At the bottom of the rolling tool is an indentation that fits into a base, where you can press a better pot bottom that stands more straight than if you just use a glass or vase.
More Helpful Tools for DIY Plant Pots:
Paper pot making tool
Paper cutter
Germination Heat Mat
DIY plant pots from cardboard rolls
1. Collect cardboard rolls Spent paper towel, bath tissue and wrapping paper rolls make great DIY plant pots. The cardboard is durable but light enough to biodegrade.
2. Decide height Decide how tall you want your pots and cut the rolls accordingly. You will need to cut at least 1/2 to 3/4 inch longer than the desired height of your pot.
3. Make cuts Use a scissors to make 5 or 6 vertical cuts on one end of the roll. Cut 1/2 to 3/4 inch into the tube, making a tab. If it helps, draw a line around the roll to make sure you get all the cuts the right length (if they are uneven, the pot may not sit straight).
4. Fold tabs Fold the tabs formed by the cuts to the inside of the roll, overlapping as you go.
5. Press the bottom Press the newly formed pot on a table to flatten the bottom and crease the folds. Don't worry if it doesn't stand up perfectly straight, once filled with potting mix and moistened, it can be adjusted to stand better.
6. Plant seeds Plant seeds and water in. Cardboard rolls tend to dry quickly, so check for water daily and water when potting mix is dry.
7. Plant outside When seedlings are ready to move outside, plant pot and all in the ground, making sure to cover the top of the pot with soil. The cardboard pot will biodegrade over the course of the growing season. Moistened cardboard is easy to tear off if you would rather plant without the pot, which can then go in the compost pile.