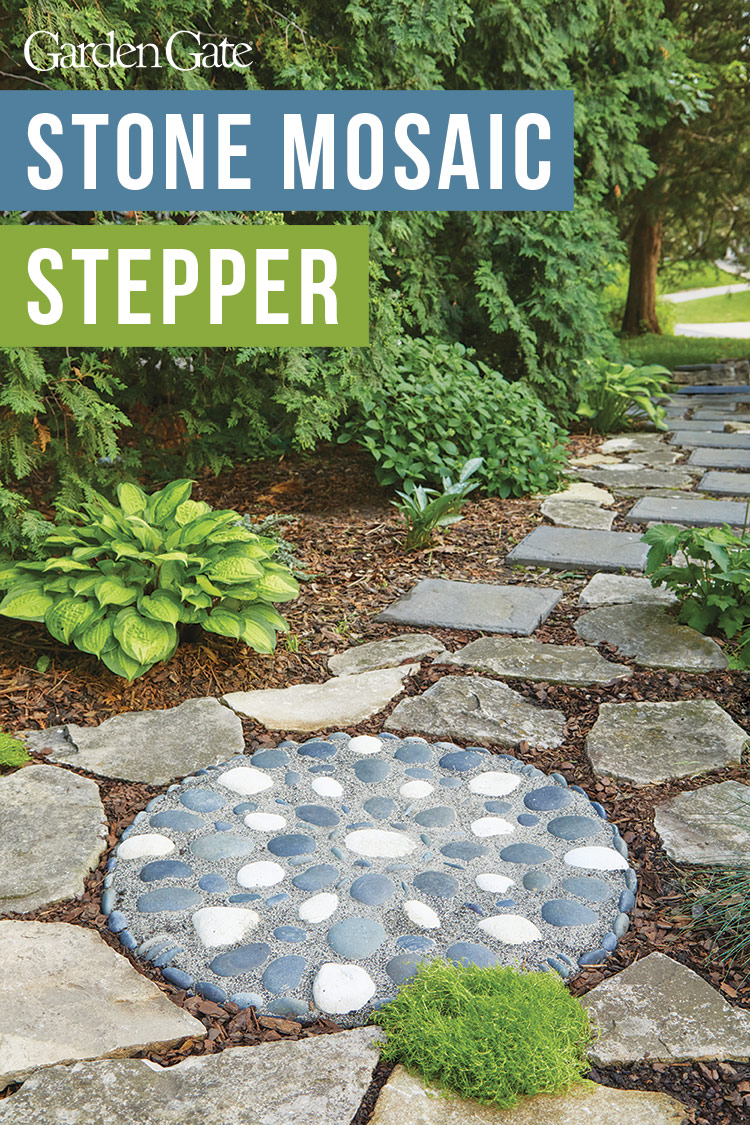
Create your own stone mosaic
A beautiful stone mosaic can be a work of art for your garden. Tuck one into a seating area, make it the focal point of a path… the possibilities are endless! We decided a large circle mosaic would make the perfect start to a shady sideyard path at our test garden. Watch the video above to see how Carrie created this stone mosaic design in our test garden. Find what materials and tools you’ll need to make your own and scroll on for helpful step-by-step instructions.
Materials
- .5-cu.-ft. bag paver base or turkey grit (4)
- Flexible plastic lawn edging with stakes (We used 107 in. of edging for this mosaic)
- .5-cu.-ft. bag paver sand (2)
- 30-lb. bag of 1- to 5-in.-diameter Mexican beach pebbles (1)
- 30-lb. bag of large egg rock Caribbean beach pebbles (1)
- 40-lb. bag of polymeric paver sand (also called paver locking sand) (1)
Tools
- Hula Hoop of desired size (We used 34-in.-diameter hoop for this mosaic)
- Sand or flour for marking
- Shovel - Garden rake
- Tamper
- Plywood scrap
- Rubber mallet
- Level
- Broom
- Wooden board
- Garden hose nozzle with mist setting
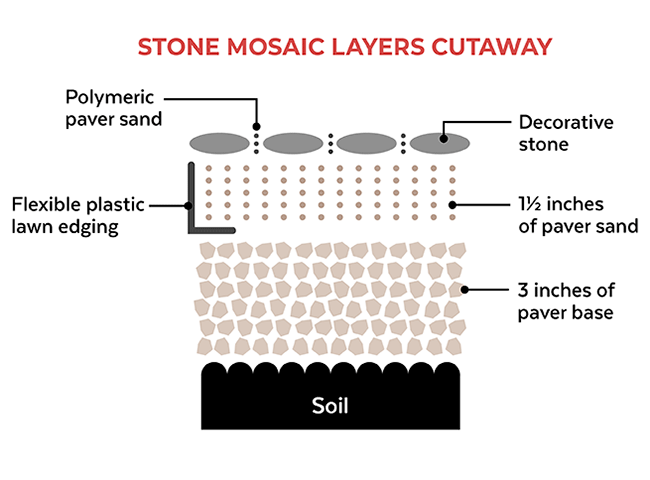
Stone mosaic layers cutaway
There are a few important layers of material that need to be in place to create a successful stone mosaic. The diagram above shows a cutaway view of the different materials and proper layering of the paver base, paver sand, decorative stones, and polymeric paver sand for assembly.
Prepare the space
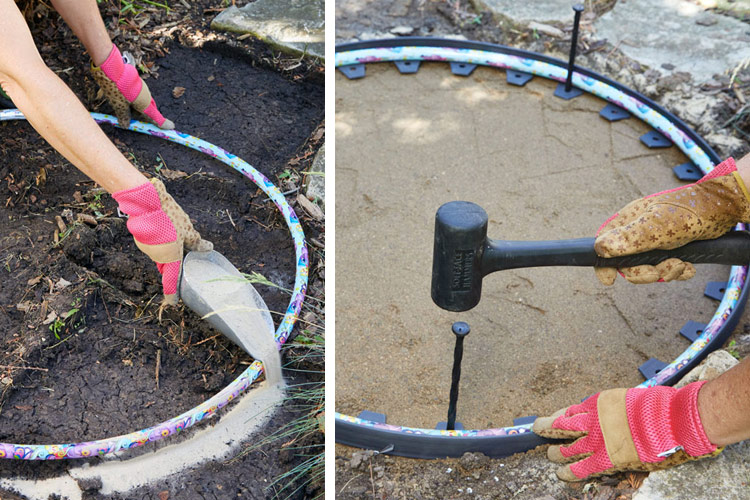
A 34-inch Hula Hoop® makes an easy template for this circular project. Once you’ve found the perfect spot for your stone mosaic, lay the Hula Hoop down and mark the perimeter with sand or flour. This is an easy way to mark a template for digging that shows up well against the soil. Excavate 4 ½ inches of soil inside the circle.
Level paver base for the stone mosaic
Pour a 3-inch layer of paver base into the excavated circle and level it with a garden rake. Use a tamper to compact.
Next, to provide support for the shape of the design, lay out flexible plastic lawn edging outside the circle and cut to fit. Anchor it in place with the provided stakes. The Hula Hoop helps maintain a perfect round shape while measuring and setting the lawn edging. The top of the lawn edging should be at or just barely above soil level. Finally, add a 1 ½-inch layer of fine-textured paver sand and tamp it down.
You Might Also Like:
Patio Design Ideas
DIY Potting Bench
How to Create a Backyard Retreat
Design your stone mosaic
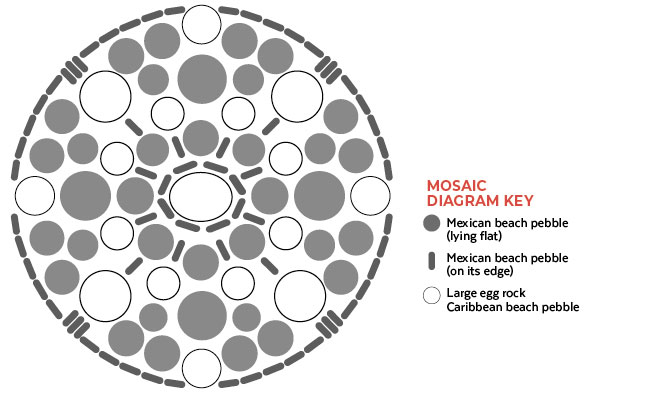
Various sizes of Mexican beach pebbles and large egg rock Caribbean beach pebbles offer the black-and-white contrast for this mosaic. We sketched several patterns out on paper first and chose the one above because it was simple and symmetrical, but there are so many possibilities. Scroll down to see three inspiring path designs featuring Mexican beach pebbles.
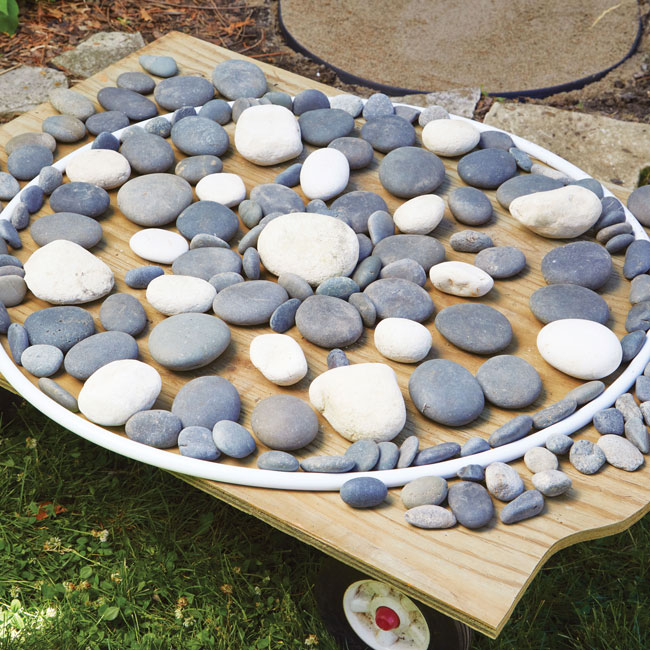
Do a dry run
Play with different design ideas by laying out the stones inside a Hula Hoop centered on a scrap of plywood ahead of time to see how the pebbles will fit. This will save you time later when installing the stones. Then use a garden cart to roll the design near the work area.
Set the stones in place
Start in the center and transfer the pebbles to the mosaic site, pressing each into the paver sand by hand. Tap larger stones in deeper with a rubber mallet so the tops are all at the same level and it is safe to walk on. Smaller pebbles around the perimeter are spaced 1⁄8-inch apart.

Make sure it's level
Make sure to level the tops of all stones to avoid creating a tripping hazard along the path. The 4-foot-long 1×6 board we used above was just the right length to level the design before we set the stone mosaic with polymeric paver sand.
You Might Also Like:
DIY Sandcast Birdbath
Dreamy Cottage Garden in Maine
Our Most Popular Gardening Videos on YouTube
Set the stone mosaic
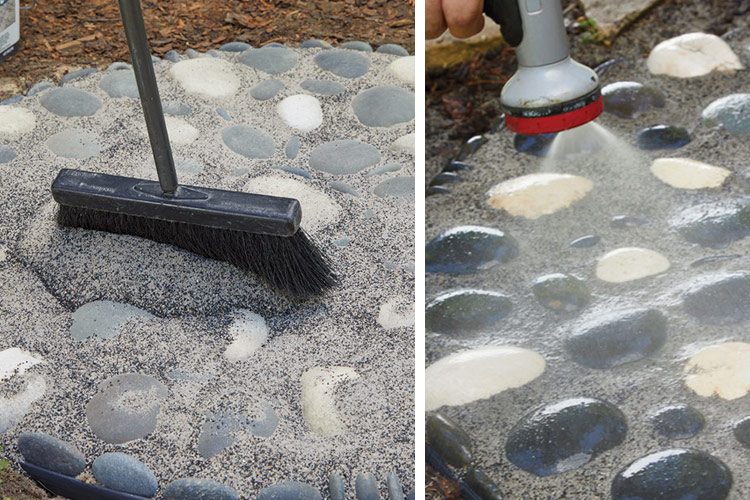
Once the design is complete, set the mosaic by pouring polymeric paver sand (also called paver locking sand) over the entire surface and sweep into all crevices. Make sure no polymeric sand particles are on the rock as it will harden there, ruining the smooth surface of the design.
To set the stone, use a garden hose nozzle with a mist setting to lightly spray the surface with water. Saturate the polymeric sand according to package directions so water permeates and activates the polymer to harden the sand. Let it dry completely (about two days) before stepping on the design.
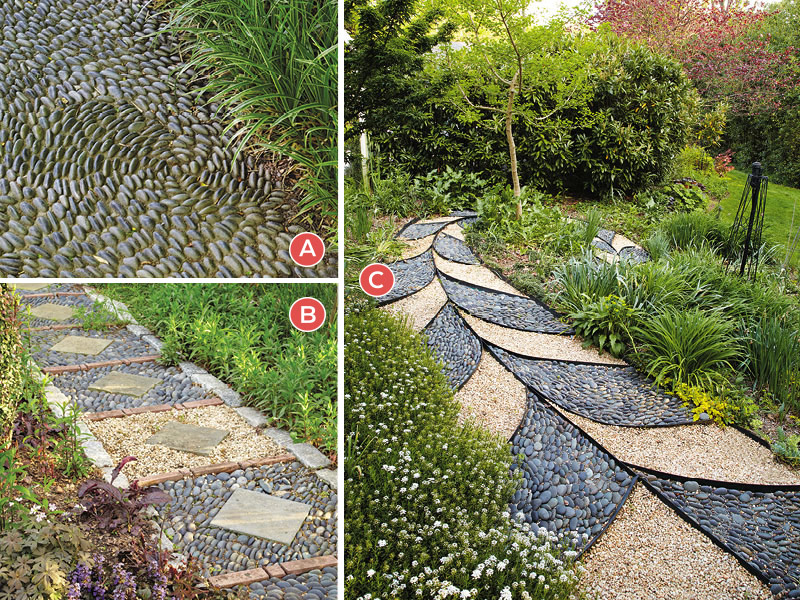
More stone mosaic inspiration
Mexican beach pebbles are a popular material for using in paths because of their smooth surfaces. Each of these designs shows off this distinctive stone.
A) Pebbles
Mexican beach pebbles closely positioned on their edge create interesting patterns in a path. The design flows organically, like running water.
B) Pebbles + Gravel
The fine texture of pea gravel alternates with smooth Mexican beach pebbles, anchored by metal edging for eye-catching contrast. The metal edging keeps the stones contained and creates a chevron pattern that adds movement, pointing the way for visitors to walk.
C) Pebbles + Gravel + Pavers
Centering square pavers on point within each pebble and gravel block creates a contrast of textures as well as support to each step. Pavers used between materials and along the edges keep the smaller stones anchored in place.
You Might Also Like:
Shop Garden Plans and Woodworking Projects
Colorful Shade Garden Plant Combinations
Before & After: Side Yard Makeover
Pin this Project for later!