Special Gift Offer
URL:
http://www.gardengatemagazine.com/articles/how-to/prune/how-to-create-a-spiral-topiary/
Share:

DIY Spiral Topiary

By: James A. Baggett James A. Baggett
Save money by learning how to create a spiral topiary and provide your garden with a focal point that you can be proud of.

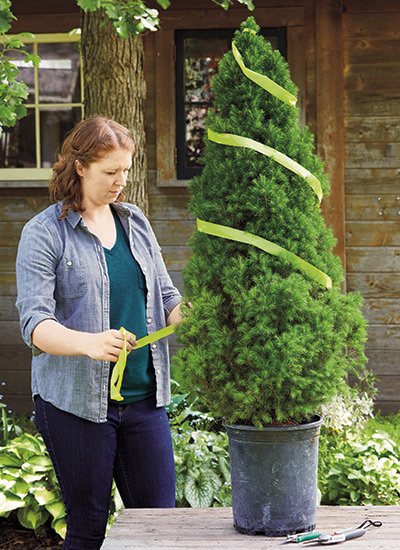
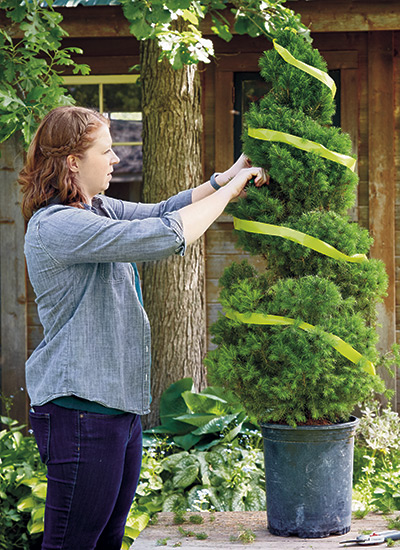
Create your own spiral topiary

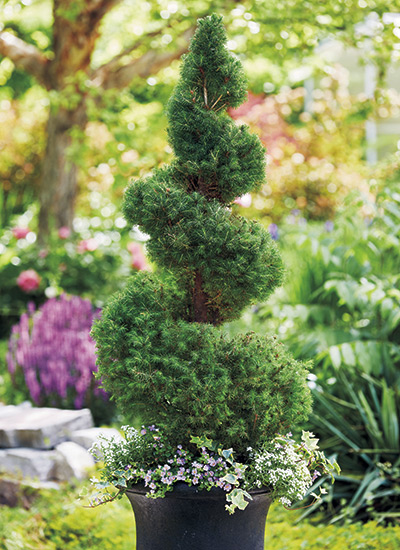
Although it looks difficult, it is actually fairly easy to create and maintain a spiral topiary. Whether in the ground or in a container, a spiral topiary is a little touch of whimsy with a decidedly formal flair. You can find a 4-foot tall evergreen topiary like this for sale at nurseries and garden centers for $100 and up. But you can get the hands-on satisfaction of doing it yourself for less than half that amount. Learn how in the steps below, and then watch my friend Katie create one in the video above.

You Might Also Like:
DIY Privacy Screen
Cozy small-Space Garden
DIY Potting Bench How To Video
Patio Design Ideas

Add style to your garden with spiral topiary

Curvy-swervy topiary is not just for formal gardens. It can transform a deck, a bed or a border from just-OK to picture-perfect without a hint of pretense. There’s something about a spiral that makes people smile. Use a pair to frame a vista or to flank a front entrance or garden gate. Planted in large terra-cotta pots, a pair can add pop to the corners of a parterre. Or dress up and complete a romantic cottage garden. Plant a line of spiral topiaries in a contemporary garden and take the space from textbook modern to something fun and personal. 

Materials & Tools

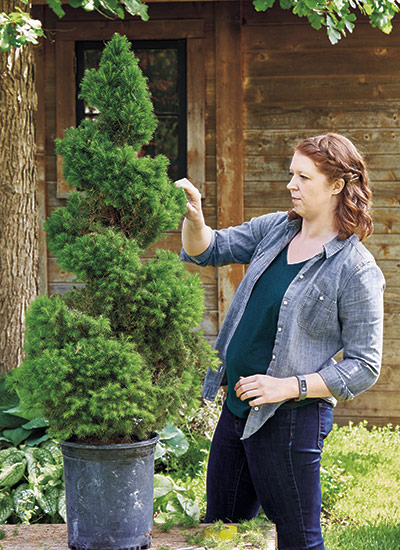
Trees that work well for spiral topiary

Evergreen trees and shrubs like the dwarf Alberta spruce here make the best spiral topiaries because of their sturdy trunks and year-round color. Conically shaped trees are the easiest to clip into a spiral shape. See the list below for types of trees that work well, or check with your local garden center for the best choices for your region.

  • Common boxwood (Buxus sempervirens)
  • Italian cypress (Cupressus sempervirens)
  • Privet (Ligustrum vulgare)
  • Dwarf Alberta spruce (Picea glauca)
  • Yew (Taxus baccata)
  • Arborvitae (Thuja occidentalis)
  • Japanese holly (Ilex crenata)

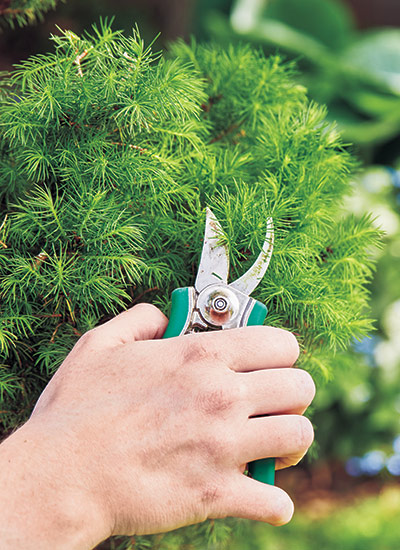
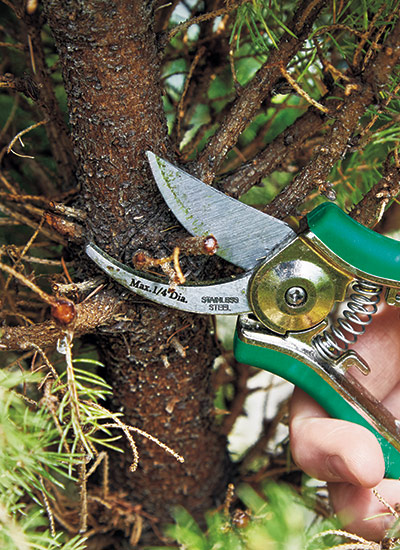
Topiary pruning tips

  • Pruners can get sticky from sap or resin when pruning, so using wet wipes can help to keep the blades from sticking. A good soak in white vinegar will also do the trick.
  • Pruning triggers new growth, so avoid pruning a month or so before your first frost date to avoid zapping tender new growth with cold temperatures.
  • When new growth emerges in spring, it’s okay to start pruning the spiral topiary again to maintain the shape.

How to create a spiral topiary

Step 1: Lay out the spiral with ribbon

Step 1: Lay out the spiral with ribbon

Wind a piece of flagging tape or ribbon candy cane style from the top of the conifer down and around, dividing it into three or four sections, gradually increasing in width toward the base.

Topiary tip

If you want to create a pair of topiaries, wrap both spirals with ribbon first to make sure you will have a matched set.

Step 3: Refine the spiral shape

Step 3: Refine the spiral shape

Remove the ribbon and use pruners to follow the spiral shape, removing any branches and twiggy growth in the groove all the way to the trunk. Don’t be timid — if you make a mistake, the plant will grow back. Follow the shape and clean up the top and undersides of the groove, widening it to 4 or 5 in. wide and rounding off the edges. Regular touch-ups throughout the year will maintain the form.

Step 5: Tidy up spiral shape

Step 5: Tidy up spiral shape

Once the groove is cut, tidy up the rest of the plant, clipping the branch tips to round it out.

Step 2: Cut in rough spiral shape

Step 2: Cut in rough spiral shape

Use pruners to clip a 3- to 4-in.-wide groove between the ribbon “stripes” about halfway to the trunk. Clip a little at a time, from top to bottom. Stand back to review your progress.

Step 4: Cut branches back to trunk

Step 4: Cut branches back to trunk

Don’t be afraid! Cut all branches and twigs in the groove back to the trunk to create a more defined shape.

Step 6: Plant your spiral topiary

Step 6: Plant your spiral topiary

The completed topiary is right at home outdoors in a container or in the ground. Either way, be sure to follow the light requirements on the tag and place it in the right spot. Keep in mind that if you’re going to keep it in a container, the pot needs to be sized up in proportion to the plant as it grows.

Container tip

As a general rule, the container should be one-third the size of the plant height. Closely manage the water a container topiary gets: don’t let it dry out and don’t overwater it or let it stand in water.

Step 1: Lay out the spiral with ribbon

Step 1: Lay out the spiral with ribbon

Wind a piece of flagging tape or ribbon candy cane style from the top of the conifer down and around, dividing it into three or four sections, gradually increasing in width toward the base.

Topiary tip

If you want to create a pair of topiaries, wrap both spirals with ribbon first to make sure you will have a matched set.

Step 2: Cut in rough spiral shape

Step 2: Cut in rough spiral shape

Use pruners to clip a 3- to 4-in.-wide groove between the ribbon “stripes” about halfway to the trunk. Clip a little at a time, from top to bottom. Stand back to review your progress.

Step 3: Refine the spiral shape

Step 3: Refine the spiral shape

Remove the ribbon and use pruners to follow the spiral shape, removing any branches and twiggy growth in the groove all the way to the trunk. Don’t be timid — if you make a mistake, the plant will grow back. Follow the shape and clean up the top and undersides of the groove, widening it to 4 or 5 in. wide and rounding off the edges. Regular touch-ups throughout the year will maintain the form.

Step 4: Cut branches back to trunk

Step 4: Cut branches back to trunk

Don’t be afraid! Cut all branches and twigs in the groove back to the trunk to create a more defined shape.

Step 5: Tidy up spiral shape

Step 5: Tidy up spiral shape

Once the groove is cut, tidy up the rest of the plant, clipping the branch tips to round it out.

Step 6: Plant your spiral topiary

Step 6: Plant your spiral topiary

The completed topiary is right at home outdoors in a container or in the ground. Either way, be sure to follow the light requirements on the tag and place it in the right spot. Keep in mind that if you’re going to keep it in a container, the pot needs to be sized up in proportion to the plant as it grows.

Container tip

As a general rule, the container should be one-third the size of the plant height. Closely manage the water a container topiary gets: don’t let it dry out and don’t overwater it or let it stand in water.

Published: Aug. 6, 2019
Updated: Feb. 8, 2021
Share:

Product Recommendations

Here are some supplies and tools we find essential in our everyday work in the garden. We may receive a commission from sales referred by our links; however, we have carefully selected these products for their usefulness and quality.

GDT_DutchTour2024_300x250

Related Tags

budget friendly diy garden design project pruning special techniques

Related Articles


GDT_NewsletterBanner_zone10
GDT_SubPromoAd_DigitalPremium_zone7and11MOBILE_Free_Book

You Might Also Like…

GDT_New Garden Idea Book_865x490_022024