Make your own rain chain
Rain chains are decorative elements with a practical function: to guide water in a sculptural and controlled way. They’re used in place of downspouts, but that’s not the only spot where they can catch water. Hung from tree limbs, pergolas, garden sheds or other creative spots, flowing water can be harnessed into an aesthetically pleasing feature.
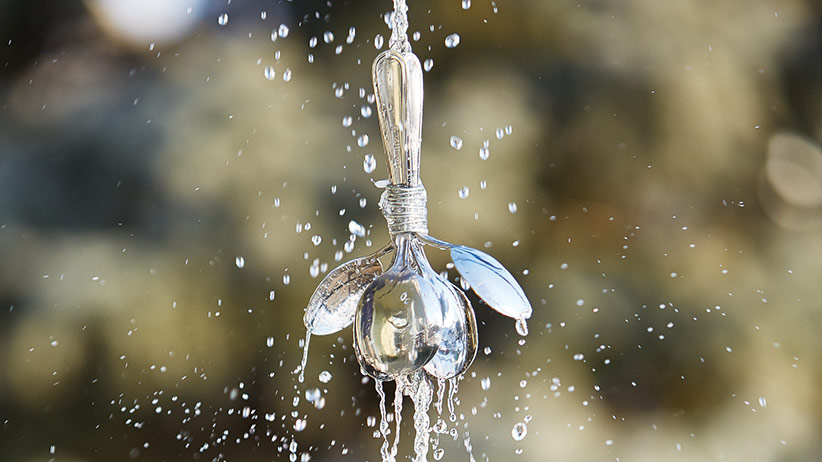
As I brainstormed ideas for a DIY rain chain, I wanted to use items that didn’t necessarily hold the water but directed the flow downward. Something that was affordable and easy to assemble with minimal tools was a priority, too. And I wanted to make it unlike any rain chain I’ve seen in a store. My solution: repurposing forks, spoons and jack chain to make this floral-inspired DIY rain chain. It looks good when the weather is dry and when it’s raining.
Personalize your rain chain
I found that it was easiest to purchase inexpensive flatware. This way every spoon matched and was easy to bend — soup spoons with wide, curved bowls work best. You can repurpose old mismatched flatware, too, just test out how they will distribute water before constructing the whole rain chain. Adjust the length of jack chain between the clusters of flatware (which I call flowers) to suit your needs, too. I wanted a long rain chain that wasn’t too heavy, so there’s 12 inches of jack chain between each flower, but you can adjust the length of chain between each flower to suit your needs. Hang your chain above a rain barrel, basin or swale to keep water from pooling beneath.
Take a look at the materials and tools below — this is enough to make a 10½-foot rainchain with eight flowers. Then follow the steps — you’re bound to discover a great way to make it work for your garden.
Materials & tools to make a DIY rain chain
The list of materials below is enough to create eight flowers and a 10½-foot chain.
Materials
- 8 feet of 16# jack chain (more for hanging)
- 48 soup spoons
- 8 forks
- Duct tape
- 25 feet of 25# galvanized wire
- 8 split rings, size 4
- 1 S-hook for hanging
Tools
- Drill with 3/32-inch titanium drill bit
- Needlenose pliers
- A chunk of scrap wood
- Wire cutters
- Split ring tool (optional)
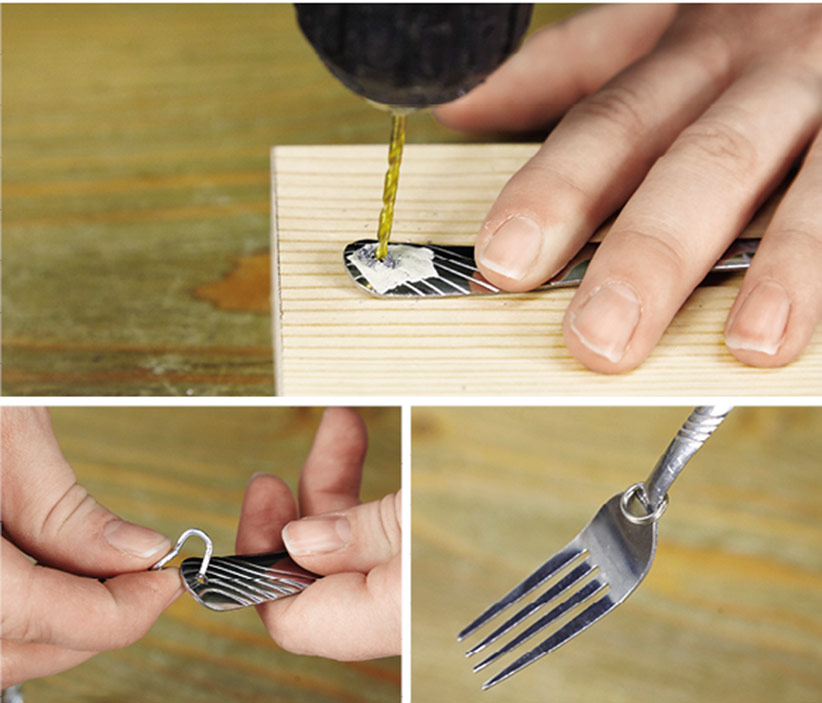
Step 1: Make the base of your DIY rain chain
The forks connect the lengths of jack chain and act as a spacer between the spoons. It’s easiest to connect all the forks and jack chain first before adding any of the spoons.
- Drill a hole at the top of each fork handle, close enough to the edge so that the jack chain can loop through the hole. A small piece of masking tape prevens the drill bit from slipping.
- Add a split ring to the neck of each fork, just above the tines, using pliers or a split ring tool.
- Connect each fork with a 12-inch length of jack chain. Loop the top link of the jack chain around a split ring of one fork, clamp it shut, and then loop the bottom link of the jack chain through the hole in the handle of the next fork. Continue adding chain and forks until you reach the desired length.
- Use the pliers to bend the tines slightly, some forward and some back; they’ll stick out from the spoon flowers like stamens!
You Might Also Like:
Save Water with this DIY Rain Barrel
DIY Garden Chandelier
How to Make a Raised Garden Bed
DIY Potting Bench
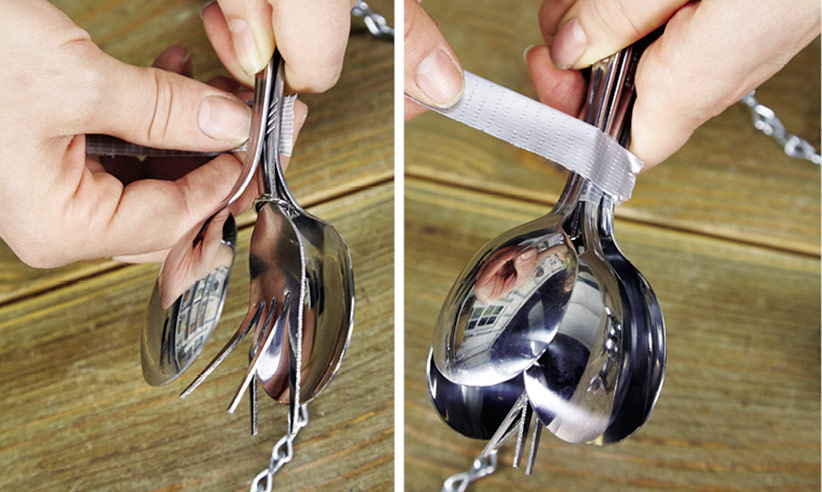
Step 2: Attach the “flowers”
To make each flower you’ll need six spoons — four for the petals and two for the leaves. Have a handful of 2-inch strips of duct tape on hand, too. The trick to assembling the flower is to keep the handles of the spoons and fork from slipping.
- Attach the petals first. Place the fork on top of a face-up spoon (you may need to bend the bowls of the petal spoons slightly so that all of the handles will fit snugly together). Then, place another spoon face down on top of the fork. Wrap your palm securely around the handles to keep them aligned, and tightly wrap a strip of duct tape around all three necks of the flatware.
- Place another spoon face up in your palm, turn the stack of three on its side and line up the handles. The last of the four petal spoons goes face-down on top of the stack. Secure with another strip of duct tape.
- Add the “leaves”. Deeply bend two spoons to somewhere between a 45-degree and 90-degree angle. Then line up the handles of these spoons on top of the handles of the flower cluster. Wrap another piece of tape around the neck. Your flower is complete. Repeat this process with each of the forks.
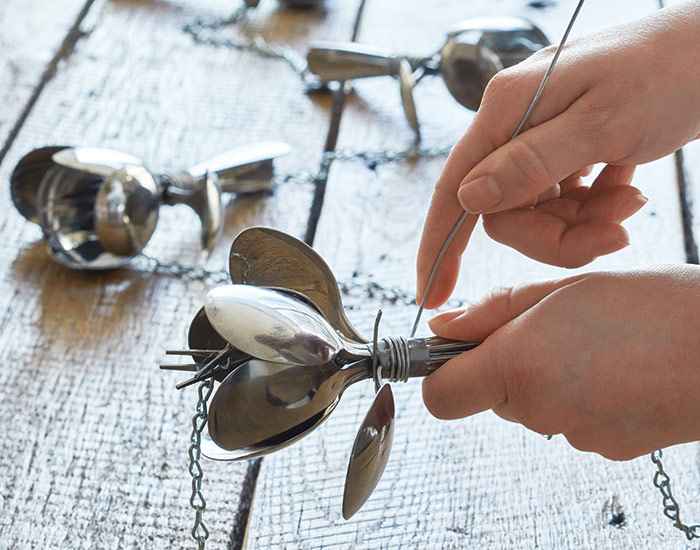
Step 3: Finishing touches
You’re on the homestretch! You can’t count on the duct tape to hold the spoons long-term, so the last element to the assembly is the galvanized wire, which adds extra support.
- Tuck a 16-inch length of wire between the necks of the silverware and wrap around the handles until the duct tape is covered.
- Use the Needlenose pliers to bend the ends of the wire so that it no longer sticks out.
- Now it’s time to look over each flower and make any adjustments to the petals. Hang your DIY rain chain with an S-hook and a nail or a carabiner. Or purchase a rain chain adapter and hang in place of your downspout.